Microsoft Entra ID - Call Protected APIs using Managed Identities
Say Goodbye to Secrets

Entra ID Managed Identities are great. They enable authentication & authorization to Azure resources without the need to store & manage credentials.
This works well if you, say, have an Azure Container App which connects to an Azure SQL Database. It's possible to use a managed identity to authenticate with the database so that you don't need to hardcode explicitly configure a password in a connection string.
This is all well & good when talking to Azure services - Azure SQL, Cosmos DB, Key Vault, etc. But when an app needs to talk to a custom API protected with Entra ID, the documentation states that one must use an App Registration along with a Client ID & Secret/Certificate to acquire a token for the downstream API. This means that your app will need to store this secret/certificate somewhere & have a process in place to rotate it when it inevitably expires. Not ideal when Managed Identities were created specifically to solve for this scenario.
For ASP.NET Core apps, the Microsoft Identity Web library is the recommended way for interacting with the Microsoft Identity Platform to protect APIs with Entra ID, acquire access tokens & a whole host of other auth-related stuff. The most common approach I've encountered in the wild for acquiring an access token on behalf of an app (as opposed to a user) is to use the Client Credentials flow which relies on supplying a client ID along with a client secret (which is not recommended for production 🤫) or client certificate.
Fast-forward to February 2024, the 2.17.0 release of Microsoft Identity Web included this new feature in the release notes:
- Added support for Managed identity when calling a downstream API on behalf of the app. See Calling APIs with Managed Identity and PR 2650. For details see PR #2645
This was intriguing! Did this mean I could throw my secrets in the rubbish bin? Spoiler: Almost.
To get this to work, a few prerequisites need to be in place:
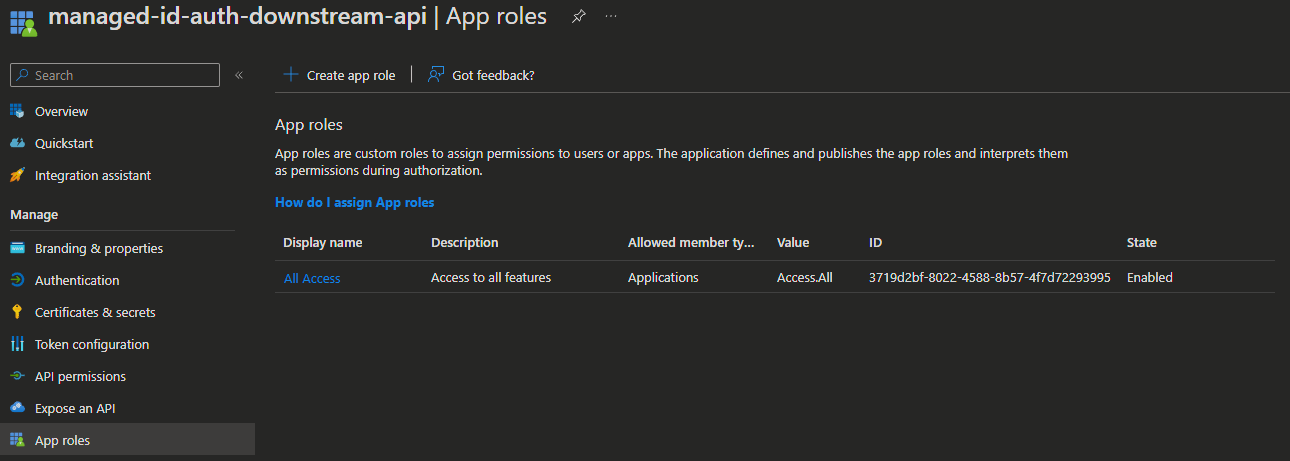
The downstream API which is protected with Entra ID needs at least one App Role defined on the App Registration
The calling API should have either a System-Assigned Managed Identity or User-Assigned Managed Identity associated to the compute resource
The Managed Identity used by the calling API must be assigned to the App Role on the downstream API's App Registration by following the approach detailed here - There is no UI to do this in the Azure Portal at the time of writing & hence must be done via Azure PowerShell or the Azure CLI
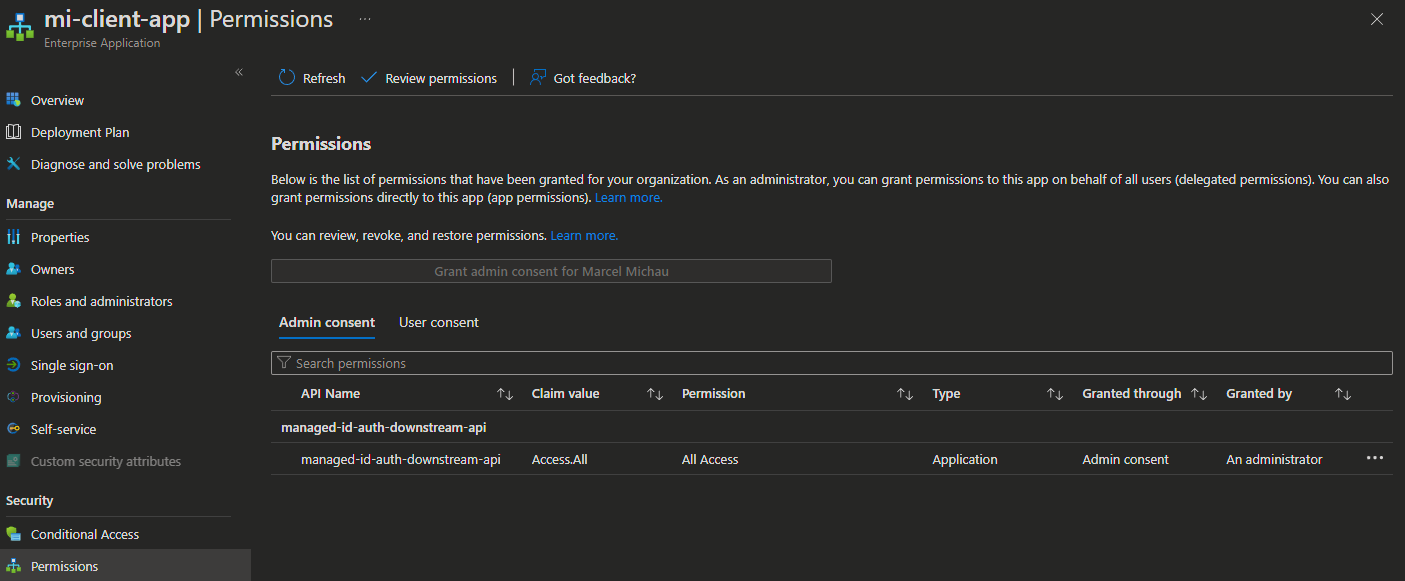
You can confirm that step 3 was successful by navigating to the Microsoft Entra ID blade in the Azure Portal > Enterprise Applications > Switch the 'Application type' filter to Managed Identities > select the app with the same name as your Managed Identity > Permissions - note that when using a System-Assigned Managed Identity, the name of the Managed Identity will be the same as your compute resource name.
So given the following App Registration with its App Roles:
This is what the Managed Identity Enterprise App Permissions should look like:
This is not entirely different from how we used App Registrations to achieve this. The key difference between the App Registration setup & the Managed Identity setup is that, when using Managed Identities, the App Role on the downstream API is assigned to the client app’s Managed Identity rather than to an App Registration. This means that an App Registration need not be created to represent the client app within the Microsoft Identity Platform, it can just use a Managed Identity. However, if the client app is, itself an API which needs to authenticate users or applications, then it will still require an App Registration of its own. A daemon application, for example, would not require an App Registration at all.
What changes from a code perspective? Let's have a look - The following example showcases an ASP.NET Core Web API (protected by Entra ID) which calls a downstream ASP.NET Core Web API (protected by Entra ID) on behalf of the app.
This example shows the configuration & code using the Client Credentials flow to call a downstream API - in this case, the quintessential Weather API. For simplicity, the below code uses the IDownstreamApi helper interface for calling the API, which takes care of acquiring the token, attaching the Authorization header to the request, handling errors & deserialising the response. There are also other options which allow for more flexibility, such as the low-level ITokenAcquisition or ITokenAcquirerFactory interfaces, or the IAuthorizationHeaderProvider interface, depending on your use case or preference.
appsettings.json:
{
  "AzureAd": {
    "Instance": "https://login.microsoftonline.com/",
    "TenantId": "<tenant id guid>",
    "ClientId": "<app registration client id guid>",
    "ClientCredentials": [
      {
        "SourceType": "ClientSecret",
        "ClientSecret": "<client secret>"
      }
    ]
  },
  "DownstreamApi": {
    "BaseUrl": "https://weather-api/",
    "RelativePath": "WeatherForecast",
    "RequestAppToken": true,
    "Scopes": [ "api://<downstream api name or app id>/.default" ]
  }
}
Program.cs:
builder.Services.AddMicrosoftIdentityWebApiAuthentication(builder.Configuration)
    .EnableTokenAcquisitionToCallDownstreamApi()
    .AddDownstreamApi("WeatherApi", builder.Configuration.GetSection("DownstreamApi"))
    .AddInMemoryTokenCaches();
Controller:
[ApiController]
[Route("[controller]")]
public class WeatherForecastController(
    ILogger<WeatherForecastController> logger,
    IDownstreamApi downstreamApi) : ControllerBase
{
    [HttpGet(Name = "GetWeatherForecast")]
    public async Task<IEnumerable<WeatherForecast>> Get()
    {
        try
        {
            var results = await downstreamApi.GetForAppAsync<IEnumerable<WeatherForecast>>("WeatherApi");

            return results ?? [];
        }
        catch (Exception ex)
        {
            logger.LogError(ex, "Something went wrong");
            return [];
        }
    }
}
To enable the Managed Identity flow, update the appsettings.json file to remove the ClientCredentials section from the AzureAd section & add an AcquireTokenOptions section inside the DownstreamApi section as shown:
{
  "AzureAd": {
    "Instance": "https://login.microsoftonline.com/",
    "TenantId": "<tenant id guid>",
    "ClientId": "<app registration client id guid>"
  },
  "DownstreamApi": {
    "BaseUrl": "https://weather-api/",
    "RelativePath": "WeatherForecast",
    "RequestAppToken": true,
    "Scopes": [ "api://<downstream api name or app id>/.default" ],
    "AcquireTokenOptions": {
      "ManagedIdentity": {
        "UserAssignedClientId": "<managed identity client id>"
      }
    }
  }
}
Note that when using a System-Assigned Managed Identity, the UserAssignedClientId property can be omitted, like so:
"AcquireTokenOptions": {
  "ManagedIdentity": {
  }
}
The controller code or Program.cs code does not need to be updated.
The above example holds true for API calling a downstream API, but using a Worker service is also supported, though the configuration differs slightly as the Worker service is a daemon app. There is also a super minimal Console app example in the GitHub repo wiki.
One thing I should call out is that, while this approach is awesome & prevents the need to store credentials & manage their rotation, there are some limitations to using Managed Identities for Authorization. Most notably that Managed Identity tokens are cached by the Azure infrastructure for up to 24 hours with no currently supported way to force a refresh of the token. The docs state that this delay is applicable only when using Entra groups with Managed Identities & recommend using a user-assigned managed identity with permissions applied directly to the identity, instead of adding to or removing managed identities from a Microsoft Entra group that has permissions. I have not tested this extensively, but I will be running some experiments to kick the tyres.
A crucial aspect of using Managed Identities for authorization is that Managed Identities only work in Azure. This might seem obvious, but it's worth noting as this means that this approach will not work for local development scenarios. If you want to call the protected API from your local machine, you will either need to:
Create an App Registration with a Client ID & Secret with the sole purpose of local development use - as well as using different config for local dev to use the Client Credentials flow
Mock the call to the protected API only for local development/running integration tests locally
And that's why I said you can almost throw your secrets in the rubbish bin. Alas, there are no free lunches. 🙂
I'm sure this approach works for a broad set of use-cases such that we can start slowly chipping away at the number of secrets which need managing. I might be coming across as a secret-basher, but it's not like expired or leaked secrets ever caused anyone any trouble, right? 😉